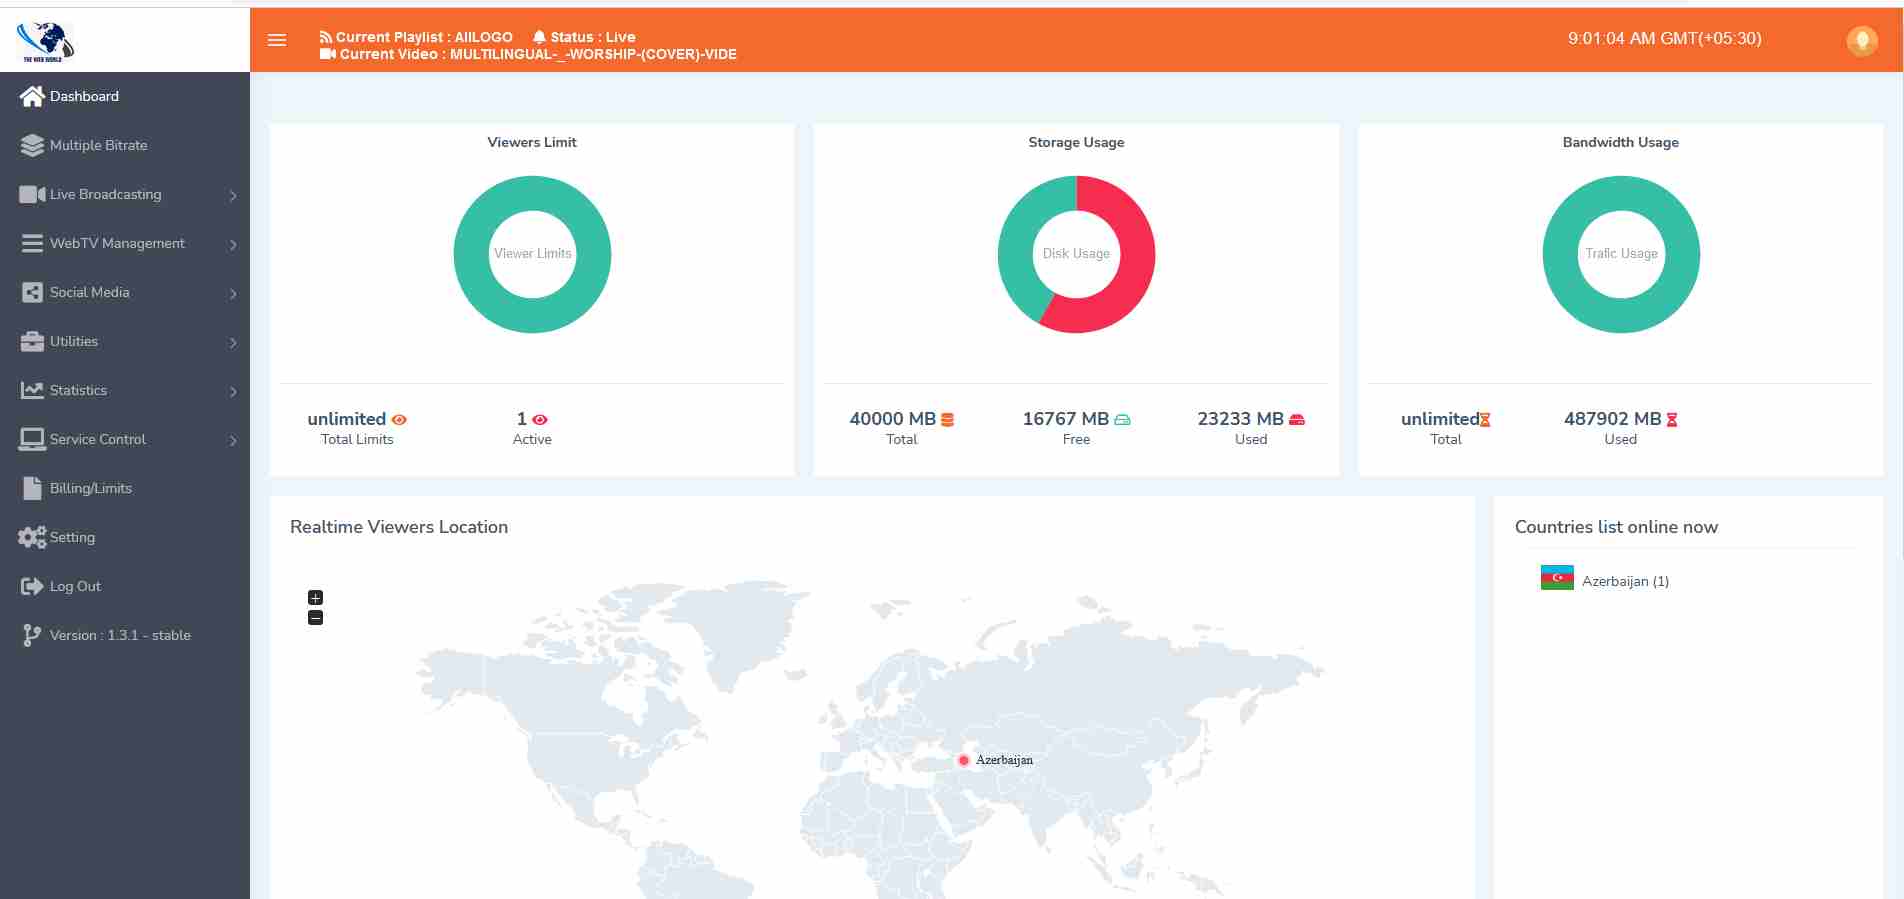
The Dashboard lets you monitor the various statistics related to your broadcasting account such as Viewers Limit, Storage Usage, Bandwidth Usage, Viewers Location, etc.
To access TV Panel Dashboard:
From the Left Pane, click. Dashboard
The Dashboard details display.
You can control over the live streaming by either a protected password or a static IP.
To do so:
From the Left Pane, click Live Broadcasting to expand it.
The sub-sections display.Security Setting
Recorder Setting

Click Security Setting.
The security methods display.
Check any of the following security methods as required.
Lock streaming by RTMP password auth: Selecting this option lets you make the live streaming secure by a protected password. You must have to enter the password in Stream key to do live streaming.
Lock streaming by static IP: Selecting this option lets you make the live streaming secure by a static IP. Once this option is checked, you have to enter the static IP address of the broadcasting PC or encoder. In this case you can do live streaming only through the specified static IP address.

After selected the desired option, click Update.
TV Panel lets you play a commercial playlist after the defined number of videos or seconds. For example, if you want to run a commercial video after every 5 minutes while playing a playlist, you can do this by doing a few settings:
To do commercial video settings:
From the Left Pane, click WebTV Management to expand it.
The sub-sections display.
Click Commercial Video.
The Commercial Video section displays.Specify the following settings:


Parameter | Description |
Enable/Disable commercial option | Enable this option if you want to play a commercial video after the defined number of videos or seconds. By default, this option is disabled. |
Choose commercial playlist | Lets you choose a commercial playlist to be played. Click the dropdown and select the desired commercial playlist. If a commercial playlist is not defined yet, you first need to define it. To define a playlist, refer to Adding a Playlist. |
Choose advert type | Let you choose any of the following advertisement types:
|
Put number | Let you specify the number of videos or seconds after which the commercial playlist will be played. If you have selected Play advert type after X videos option from the Choose advert type, then here you will specify the number for the videos after which the commercial will be played. Similarly, if you have selected Play advert type after X seconds option from the Choose advert type, then here you will specify the number for the seconds after which the commercial will be played. |
After specifying the commercial settings, click Update.
The procedure for uploading a broadcasting file to File Manager is as follows:
From the Left Pane, click WebTV Management to expand it.
The following sub-sections display.
Click File Manager.
The File Manager section displays.
Click the desired folder to upload a file inside it.
NOTE: If you want to upload a file at the root level, you do not need to go inside any existing folder.
Click Drag Files here to upload.
The Open dialog displays.
Browse and select the broadcasting file you want to upload and click Open.
The selected file starts uploading.
Once a file is uploaded successfully, you can view it at the selected hierarchy in the files and folders list.


Renaming a File
You have the option to rename any existing file in the File Manager. To do so:
Click Rename next to a file to rename it.
A dialog displays where system asks to enter the New name.
Enter the new name as required and click OK.
The file will be renamed.

The File Manager lets you add as many folders as required and organize broadcasting files under them.
The procedure for adding a new folder is as follows:
From the Left Pane, click WebTV Management to expand it.
The following sub-sections display.
Click File Manager.
The File Manager section displays.
Click Add Folder.
NOTE: If you want to add a folder inside any existing folder, then go inside the desired folder hierarchy and then click Add Folder.
The Create New Folder dialog displays.

Specify the folder name as required and click Create.
The folder creates at the selected hierarchy.
You have the option to rename any existing folder in the File Manager. To do so:
Click Rename next to a folder to rename it.
A dialog displays where system asks to enter the New name.
Enter the new name as required and click OK.
The folder will be renamed.
The File Manager lets you add one or multiple broadcasting files to any playlist as required.
To do so:
From the Left Pane, click WebTV Management to expand it.
The following sub-sections display.
Click File Manager.
The File Manager section displays.
In folders and files list, click Add to Playlist for the file you want to add in a playlist.
The Add Video to Playlist section displays.
From the Playlists dropdown, select the playlists in which you want to add the broadcasting file and click Add to Playlist.
The broadcasting video will be added in the selected playlist.

You can also select multiple broadcasting files and add them in the desired playlist at once.
To do so:
Check multiple files you want to add in a playlist.
Or
Click Select All to select add files.
After selecting the desired files, click Add to Playlist at the bottom.
The Add Video to Playlist section displays.


From the Playlists dropdown, select the playlists in which you want to add the broadcasting files and click Add to Playlist.
The selected broadcasting files will be added in the playlist.
The procedure for deleting a folder/file is as follows:
From the Left Pane, click WebTV Management to expand it.
The sub-sections display.
Click File Manager.
The File Manager section displays.
In folders and files list, click Delete for the folder/file you want to delete.

The system prompts to confirm the deletion.
The selected folder/file will be deleted. On deletion, the data associated with the selected folder or file will also be deleted.

TV Panel lets you make your streaming available to various social media platforms. You can make your streaming available to the following social media platforms:
YouTube
Facebook
Twitch
Periscope
Daily Motion
To do so:
From the Left Pane, click Social Media to expand it.
The sub-sections display.
Click Social Media Relay.
The settings display for the different social media platforms.Select any of the available social media platforms and do the following setting to make the streaming available for the selected platform.
Enable/Disable: Enable this option to make the streaming available for the selected social media platform. By default, this option is disabled.
Custom RTMP: You can use this URL to do the streaming on the selected social media platform.
Custom stream key: Let’s you set a key to be used for streaming on the selected social media platform.
Click the Stream Activation tab to select a streaming type for the social media.
Web TV: Select this option to do Web TV streaming on the social media platforms.


Live Streaming: Select this option to do live streaming on social media platforms.
TV Panel lets you define the bit rate to be used for the Web TV streaming. By default, it is set equal to the maximum value assigned to you by the Hosting provider. You can modify it for Web TV streaming if required.
To do so:
From the Left Pane, click WebTV Management to expand it.
The sub-sections display.
Click Transmission Control.
The Transmission Control section displays.

Specify the bit rate to be used for Web TV streaming under Your current bitrate field, and click Update.
The procedure for adding a playlist is as follows:
From the Left Pane, click WebTV Management to expand it.
The sub-sections display.
Click Playlists Management.
The Playlists Management section displays.In the Playlists Management section, click Add New Playlist.
The parameters display to add a new playlist.
Specify the following parameters:


Parameter | Description |
Title | Let’s specify the title of the playlist. For example, “Commercial Videos”. |
Mode | Let you select a mode to play the videos of the playlist. You can select any of the following modes from the dropdown:
|
Status | Let you select whether you want to make the playlist available or not. Select On or Off from the dropdown as required. |
After specifying the above parameters, click Create.
The playlist creates. Once created, it will be added to the list.
TV Panel lets you modify an existing playlist if required.
To do so:
From the Left Pane, click WebTV Management to expand it.
The sub-sections display.
Click Playlists Management.
The Playlists Management section displays.In the Playlists Management section, click Edit for the playlist you want to modify.
The playlist settings display. To get more details about the playlist settings, refer to Adding a Playlist.
Modify the playlist settings as required, and click Update.
The selected playlist will be modified.
To view the files within a playlist:
From the Left Pane, click WebTV Management to expand it.
The sub-sections display.
Click Playlists Management.
The Playlists Management section displays. Here you can view the existing playlists.Click View List for the playlist whose files you want to view.
The files located within the playlist display.

You also have the option to play a file within the playlist. To play a file. Click Show for that file. The file will be played.
Similarly, you also have the option to delete a file in a playlist. To delete a file, click Delete for that file.
The Quick Links utility lets you get video and audio player links for the Web TV, Live TV, and Hybrid streamings. Similarly you can also get the direct m3u8 and RTMP links for the streaming. Through this utility, you can get FTP login credentials to upload media files via FTP.
To use this utility:
From the Left Pane, click Utilities to expand it.
The list of the utilities display.
Click Quick Links.
The Quick Links section displays.


In this section, you can get the desired streaming links for Web TV, Live TV, Hybrid Streaming, m3u8, and RTMP streaming. You can also get the FTP credentials.
The Widgets utility lets you use the TV panel streaming to any other streaming website through HTML code. You just have to copy the desired streaming HTML code and paste it to any streaming web page.
To do:
From the Left Pane, click Utilities to expand it.
The list of the utilities display.
Click Widgets.
The Widgets section displays.
From the Widgets section, copy the HTML code of your desired streaming type and paste it to any HTML streaming web page.
Through the Widgets utility, you can get the HTML code of the following types of streaming.Server Streaming (Video)
Server Streaming (Audio)
Live Streaming (Video)
Live Streaming (Audio)
Hybrid Streaming (Video)
Hybrid Streaming (Audio)

The Branding utility lets you specify the domain to be used for your streaming channel instead of the server’s domain. You can also select a company or channel logo to be displayed on your streaming channel. You can also define the position and size of the selected logo.
To do so:
From the Left Pane, click Utilities to expand it.
The list of the utilities display.Click Branding.
The Branding section displays.Specify the following parameters:

Parameter | Description |
Main Domain | Let’s you specify the name of the domain to be used for the streaming instead of the server’s domain. NOTE: Your domain or sub-domain must be pointed to the TV Panel server’s IP. |
Watermark Logo | Let’s you select a company or channel logo to be used on video streaming. To choose a logo:
|
Choose Logo Position | Let’s you choose the position where the logo will be displayed in the streaming video. Choose any of the following positions for the logo as required:
|
Increase Logo Size by Percentage | Let’s you increase the size of the selected logo, in percentage. For example if you specify 200 as a value, then the size of the selected logo will be increased by 200%, in the video streaming. |
Active/Inactive |
|
This option lets you block your streaming channel to one or multiple selected countries. For example, if you want to block your streaming channel to Afghanistan and India then you can do this in just a few steps:
To do so:
From the Left Pane, click Utilities to expand it.
The list of the utilities display.
Click Geo Settings.
The Geo Settings section displays.
From the Select Countries dropdown, select the countries where you want to block the streaming channel.
After selecting the desired countries, click Block Selected Countries.
Your streaming will not be available to the selected countries anymore.

This utility lets you choose a background for the streaming player. You can either select a predefined background image from the Gallery or upload the desired image from the system and use it as a background of the streaming player.
To use background image:
From the Left Pane, click Utilities to expand it.
The list of the utilities display.
Click Player Background.
The Player Background section displays.Under Choose from the gallery, check the desired image you want to use as a background.
Or
Under Upload your own background, choose any desired image from the system by clicking Choose File.
NOTE: When uploading a background image, its resolution must be at least (1920 * 1080) or higher.
NOTE: The following image types are allowed to be uploaded as a background: jpeg, png, jpg. The size of the uploading image must not be greater than 2MB.

After choosing the desired image as a background, click Update.
This utility lets you make your streaming available to the specified domains only. This means that your streaming will not be available to any other domains which are not specified.
To use this utility:
From the Left Pane, click Utilities to expand it.
The list of the utilities display.
Click Domain Lock.
The Domain Lock section displays.
Specify the following parameters:
Enable/Disable: Enable this option to specify the specific domains for the streaming.
Once enabled, specify the domain(s) for which you want to make the streaming available. You can specify one or multiple domains as required. To specify multiple domains, specify the Vertical bar in between each domain. For example, “doamin1.com|domain2.com|domain3.com”.

After specifying the domains, click Update.
Your streaming will be available to the specified domains only.
This utility lets you make your streaming available to the specified IP addresses only.
To use this utility:
From the Left Pane, click Utilities to expand it.
The list of the utilities display.
Click IP Lock.
The IP Lock section displays.
Specify the following parameters:

Enable/Disable: Enable this option to specify the specific IP addresses for the streaming.
Once enabled, specify the IP addresses for which you want to make the streaming available. You can specify one or multiple IP addresses as required. When specifying multiple IP addresses, specify one IP address per line.
This utility lets you make the chat available along with the streaming player. You can also do certain chat related settings.
To do so:
From the Left Pane, click Utilities to expand it.
The list of the utilities display.
Click Chat Setting.
The Chat Setting section displays.
Specify the following settings:
Enable/Disable: Enable this option to make the chat available along with the streaming player. By default, chat is disabled.
Once the chat is enabled, specify the number of messages that will be shown in the chat conversation page.
Clear all chat messages: Click this option if you want to remove/delete all chat messages.

After doing the desired chat settings, click Update.
To restart broadcasting service:
From the Left Pane, click Service Control to expand it.
The sub-sections display.
Click Restart Broadcasting.
The system asks to restart the Broadcasting service.


Click Yes Restart.
The Broadcasting service will be restarted.
To stop the broadcasting service:
From the Left Pane, click Service Control to expand it.
The sub-sections display.
Click Stop Broadcasting.
The system asks to stop the Broadcasting service.

Click Yes Stop.
All streaming services including Live, Web TV, and Hybrid will be stopped.
To start the broadcasting service:
From the Left Pane, click Service Control to expand it.
The sub-sections display.
Click Start Broadcasting.
The system asks to start the Broadcasting service.

Click Yes Start.
The broadcasting service will be started.